Introduction
In this blog post, we will discuss the importance of HTML formatting in web blogging. HTML (Hypertext Markup Language) is the standard language used to create web pages. It allows bloggers to structure their content and make it more engaging for their readers.
When writing a blog post, it is crucial to emphasize key points to grab the attention of the audience. One way to do this is by using the <strong>strong</strong> HTML tag. This tag provides importance and weight to specific phrases or sentences, making them stand out on the page. By using the <strong> tag, bloggers can highlight crucial information and ensure that their readers don’t miss out on the main ideas.
To further enhance the organization and readability of the blog post, headers and subheaders can be utilized. HTML provides six levels of headers, ranging from <h1> to <h6>. These tags allow bloggers to structure their content hierarchically and break it down into different sections.
For instance, in this blog post, we will be using <h2> tags to denote major sections, such as the one you are reading now. By using headers, bloggers can help their readers navigate through the content easily and find the information they seek.
Another effective way to emphasize important information is by using lists. HTML offers two types of lists: ordered lists (<ol>) and unordered lists (<ul>). Ordered lists use numbers or letters to sequence the items, while unordered lists use bullet points.
By incorporating lists into the blog post, bloggers can break down complex ideas into digestible chunks and make the content more skimmable. Additionally, lists can help to structure information and present it in a logical order.
Lastly, in addition to the <strong> tag, bloggers can also use the <b> tag to apply bold formatting to specific text. While the <strong> tag denotes semantic importance, the <b> tag is used for stylistic purposes, making the text stand out visually.
In conclusion, HTML formatting plays a vital role in web blogging, allowing bloggers to enhance the readability and organization of their content. By using the <strong> tag, headers, lists, and bold text, bloggers can emphasize important information and create a more engaging reading experience for their audience.
Understanding Warts
In this blog post, we will be discussing the topic of warts and gaining a better understanding of what they are and how they can be treated. Warts are small growths that appear on the skin and are caused by the human papillomavirus (HPV).
What are Warts?
Warts are skin growths that are typically rough and raised. They can appear on any part of the body, including the hands, feet, face, and genitals. Warts are caused by an infection with the human papillomavirus.
How are Warts transmitted?
Warts are highly contagious and can be spread from person to person through direct contact. This can occur through touching, sharing personal items, or even by walking barefoot on contaminated surfaces.
Types of Warts
There are several different types of warts including common warts, plantar warts, flat warts, and genital warts. Each type of wart appears differently and may require different treatment methods.
Treatment Options
There are a variety of treatment options available for warts. These include over-the-counter medications, cryotherapy, laser therapy, and surgical removal. It is recommended to consult with a dermatologist to determine the best treatment option for your specific situation.
Prevention
To prevent warts, it is important to practice good hygiene and avoid direct contact with warts. This includes not sharing personal items such as towels or razors, wearing protective footwear in public areas, and keeping the skin clean and dry.
In conclusion, warts are a common skin condition caused by the human papillomavirus. They can be transmitted through direct contact and appear in different forms on various parts of the body. It is important to seek appropriate treatment and practice preventive measures to reduce the risk of developing warts.
Preparing the Apple Cider Vinegar Solution
Preparing the Apple Cider Vinegar Solution
To prepare the apple cider vinegar solution, follow these simple steps:
- Gather the ingredients: You will need 1 cup of pure apple cider vinegar and 3 cups of water.
- Mix the vinegar and water: In a large bowl or container, combine the apple cider vinegar and water.
- Stir well: Use a spoon or whisk to thoroughly mix the two ingredients together.
- Transfer to a bottle: Once the solution is well mixed, pour it into a clean bottle or jar with a tight-fitting lid.
- Label and date: Don’t forget to label the bottle with the contents and date of preparation.
Note: It is important to use pure apple cider vinegar without any additives or preservatives for the best results. You can store the solution at room temperature for several months.
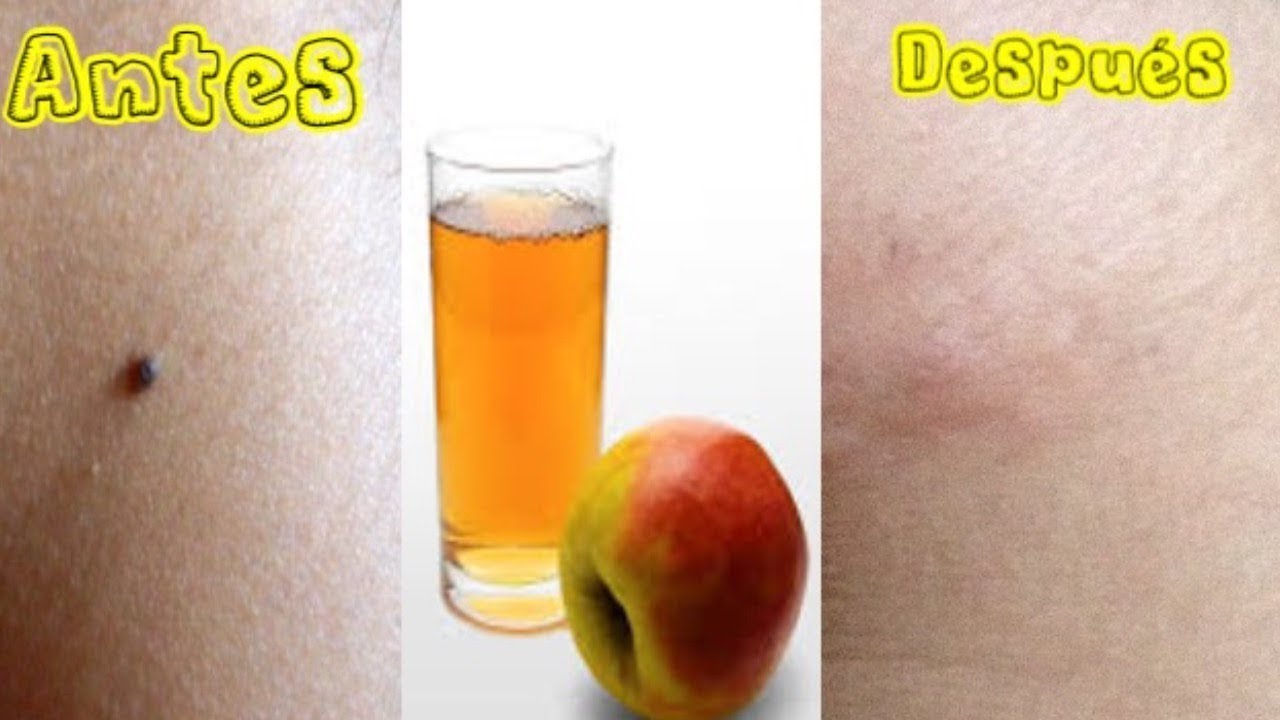
Applying Apple Cider Vinegar on Warts
Apple cider vinegar has been touted as an effective remedy for treating various skin conditions, including warts. Warts are caused by a virus called human papillomavirus (HPV), and they can be unsightly and uncomfortable. If you’re looking for a natural and inexpensive way to get rid of warts, apple cider vinegar might be worth a try.
How Does Apple Cider Vinegar Work?
Apple cider vinegar is known for its acidic properties, which can help break down and dissolve the abnormal skin cells that make up warts. The acetic acid in the vinegar is believed to attack the HPV virus directly, causing the warts to shrink and eventually fall off.
How to Apply Apple Cider Vinegar on Warts:
- Clean the affected area with mild soap and water.
- Pat dry the area thoroughly.
- Soak a cotton ball in apple cider vinegar.
- Apply the vinegar-soaked cotton ball directly onto the wart.
- Secure the cotton ball in place with a bandage or tape.
- Leave it on overnight, or for a few hours if you prefer.
- Remove the cotton ball and clean the area again.
- Repeat the process daily until the wart disappears.
Precautions and Side Effects:
While apple cider vinegar is generally safe to use, it’s important to take some precautions:
- Do not apply apple cider vinegar to open wounds or broken skin.
- Avoid using apple cider vinegar on sensitive areas, such as the face or genital warts.
- If you experience any pain, discomfort, or irritation, discontinue the use of apple cider vinegar and consult a healthcare professional.
Conclusion:
Apple cider vinegar may be a natural alternative for treating warts. However, it’s important to remember that everyone’s body reacts differently, and what works for some may not work for others. If you’re considering using apple cider vinegar for warts, it’s a good idea to consult with a healthcare professional for proper guidance and advice.
Aftercare and Precautions
After getting a tattoo, proper aftercare is crucial to ensure proper healing and prevent any complications. Here are some important steps to follow:
Cleaning:
- Gently wash the tattooed area with mild, fragrance-free soap and lukewarm water.
- Pat dry the tattoo with a clean towel or let it air dry.
Moisturizing:
- Apply a thin layer of tattoo aftercare ointment or a fragrance-free lotion to keep the tattoo moisturized.
- Do not over-apply the ointment as it can clog pores and delay healing.
Avoiding Irritants:
- Avoid exposing the tattoo to direct sunlight, swimming pools, hot tubs, and saunas for at least two weeks.
- Avoid picking, scratching, or peeling the tattoo as it can lead to infection and affect the appearance of the tattoo.
- Avoid tight or abrasive clothing that may rub against the tattoo.
Monitoring for Infection:
- Keep an eye on the tattoo for any signs of infection, such as excessive redness, swelling, oozing, or prolonged pain.
- Contact your tattoo artist or a healthcare professional if you suspect an infection.
Long-Term Care:
- Protect the tattoo from fading by applying sunscreen with at least SPF 30 when exposed to the sun.
- Keep the tattoo moisturized to prevent dryness and cracking.
Following these aftercare tips will help ensure that your tattoo heals properly and looks vibrant for years to come.