Drawing the Sun
Drawing the Sun is a fun and creative activity that you can do with kids or even on your own. With just a few simple steps, you can create a bright and cheerful sun drawing that will bring a smile to anyone’s face. Whether you’re an experienced artist or just starting out, this tutorial will guide you through the process and help you create a masterpiece.
Materials Needed:
- Paper
- Pencil
- Eraser
- Coloring utensils (crayons, markers, or colored pencils)
Step 1: Start with a Circle
Begin by lightly sketching a big circle in the center of your paper using a pencil. This will serve as the main shape of the sun.
Step 2: Add Rays
Extend lines outward from the edges of the circle to create sun rays. These can be straight or slightly curved, depending on the style you prefer. Feel free to get creative and experiment with different designs!
Step 3: Add a Face
To give your sun drawing some personality, consider adding a face. Draw two large circles for eyes and a curved line for the mouth. You can make your sun happy, sleepy, or even goofy – the choice is yours!
Step 4: Color It In
Once you’re satisfied with the outline of your sun drawing, it’s time to bring it to life with colors. Use bright yellow or orange for the Sun itself and various shades of blue for the sky in the background. Don’t be afraid to experiment with different color combinations!
Step 5: Add Details
For some extra flair, you can add additional details to your sun drawing. This can include adding clouds, birds, or other elements in the sky. Let your creativity flow and make it your own!
Remember, the most important thing is to have fun and enjoy the process. Drawing the sun can be a relaxing and enjoyable activity for people of all ages. So grab your materials and get started on your own sunny masterpiece today!
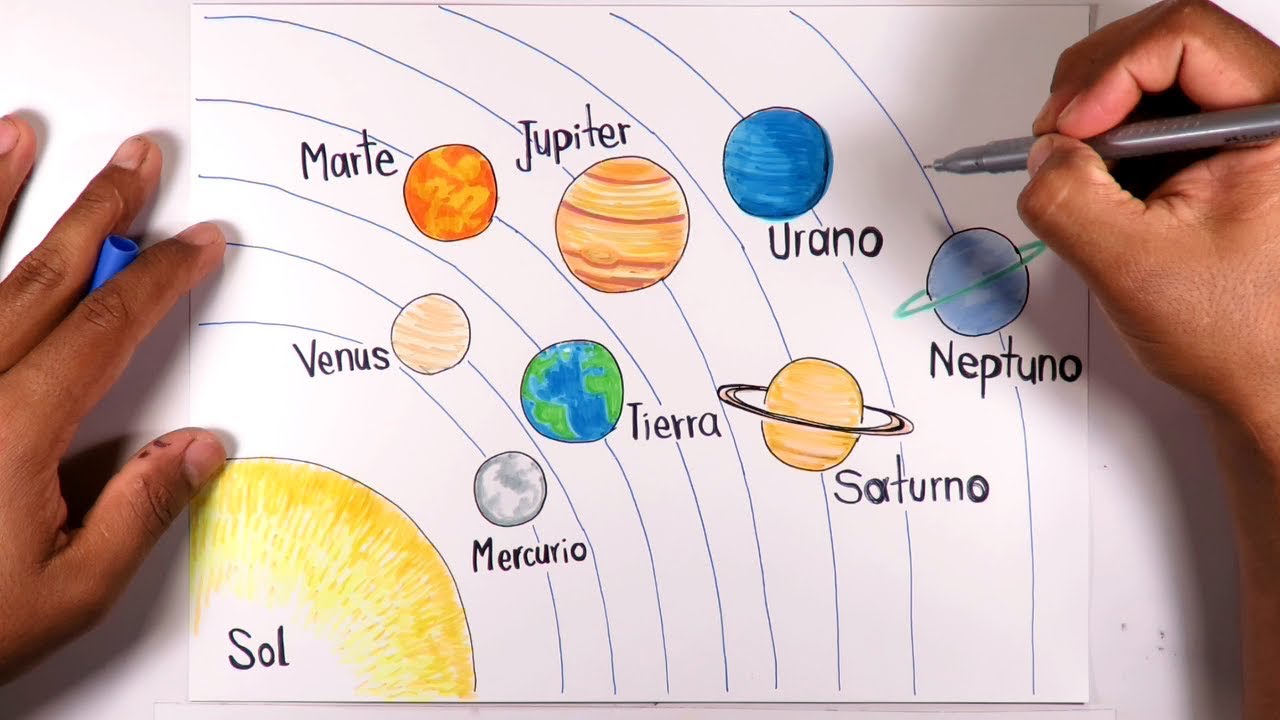
Drawing the Planets
Have you ever wondered what the planets in our solar system look like? Drawing the planets can be a fun and educational activity for kids and adults alike. In this blog post, we will explore different ways to draw each planet and learn some interesting facts about them.
Mars: The Red Planet
One of the most exciting planets to draw is Mars. Known as the «Red Planet,» Mars gets its distinct color from iron oxide (or rust) on its surface. To draw Mars, start by sketching a circle and fill it in with various shades of red. Don’t forget to add some darker areas to represent craters and lighter areas for sand dunes!
Venus: The Morning and Evening Star
Venus, often referred to as the «Morning Star» or «Evening Star,» is the second planet from the Sun. To draw Venus, begin with a large circle and use shades of yellow to represent its thick atmosphere. You can also add some white clouds to give it a more realistic look.
Jupiter: The Largest Planet
Jupiter is the largest planet in our solar system and is known for its massive size and swirling storms, such as the famous Great Red Spot. When drawing Jupiter, focus on creating a large, round shape and use shades of orange and white to represent its bands of clouds. Don’t forget to add the Great Red Spot using a darker shade of red!
Neptune: The Farthest Planet
Neptune is the farthest planet from the Sun and is famous for its vivid blue color. To draw Neptune, start with a circle and fill it in with various shades of blue, ranging from light to dark. You can also add some white swirls to represent its turbulent atmosphere. Make sure to leave some areas lighter to mimic its clouds.
These are just a few examples of how to draw the planets in our solar system. Each planet has its own unique features, colors, and characteristics, making them fascinating subjects for artwork. So grab your pencils, get creative, and have fun exploring the wonders of the universe!
Adding Details
When it comes to writing, adding details is crucial. Details provide depth and make your writing more engaging and informative. In this blog post, we’ll explore different ways to enhance your writing by incorporating relevant and impactful details.
The Power of Specific Language
Using specific language can transform a plain sentence into a vivid and captivating one. Instead of saying, «The dog was big,» you can say, «The dog was enormous.» Notice how the word «enormous» adds more detail and paints a clearer picture in the reader’s mind.
Provide Concrete Examples
Another technique to add details is by providing concrete examples. Rather than stating, «He worked hard,» you can say, «He worked tirelessly, putting in long hours and consistently going above and beyond.» This description not only emphasizes the individual’s work ethic but also gives the reader a better understanding of their dedication.
Utilize Descriptive Imagery
Descriptive imagery involves using sensory details to bring your writing to life. By incorporating vivid descriptions, you can create a more immersive experience for your readers. For example, instead of saying, «The sunset was beautiful,» you could say, «The breathtaking sunset painted the sky with vibrant hues of pink, orange, and gold.»
Create Compelling Analogies
Analogies can help simplify complex concepts and make them more relatable. By comparing unfamiliar ideas to familiar ones, you can provide your readers with a clearer understanding. For instance, instead of explaining a challenging mathematical principle in technical terms, you could say, «Understanding this concept is like solving a puzzle, where each piece falls into place, revealing the bigger picture.»
Use Personal Anecdotes
Sharing personal anecdotes can add authenticity and create a connection with your audience. It illustrates real-life experiences and adds a personal touch to your writing. For instance, instead of simply stating, «Public speaking can be nerve-wracking,» you could share a personal story, «I still remember the trembling of my hands and the rapid thump of my heart as I stepped onto the stage, ready to deliver my speech.»
Wrap Up
In conclusion, adding details is a powerful technique that enhances your writing and captivates your audience. By using specific language, providing concrete examples, utilizing descriptive imagery, creating compelling analogies, and incorporating personal anecdotes, you can elevate your writing to the next level. So the next time you sit down to write, remember to add those important details and watch your writing flourish.
Coloring and Shading
Introduction
Welcome to another blog post about coloring and shading in the world of web design! In this post, we will explore some HTML techniques to enhance the visual appeal of your website.
The Role of Colors
Colors play a vital role in attracting and engaging website visitors. They can communicate emotions, evoke certain moods, and even influence purchasing decisions. Choosing the right colors for your website can make a significant difference in how users perceive your brand or product.
Adding Colors in HTML
When it comes to HTML, there are several ways to incorporate colors. One common method is by using Hexadecimal color codes. These codes represent colors based on a combination of RGB color model. For example, the code #FF0000 represents the color red. You can apply these codes to various HTML elements, such as text, backgrounds, and borders.
Understanding Shading
Shading is another technique that can add depth and dimension to your web design. By creating lighter and darker variations of a base color, you can achieve shading effects. This can be done through the use of CSS properties such as linear-gradient and box-shadow.
Choosing the Right Shades
- Contrast – When selecting shades, be sure to create enough contrast between the background and text color for improved readability.
- Harmony – Consider using shades that complement each other to create a harmonious color scheme.
- Consistency – Stick to a consistent shade range throughout your website to establish a cohesive visual identity.
Conclusion
By leveraging the power of coloring and shading in your web design, you can create visually appealing websites that leave a lasting impression on your visitors. Experiment with different combinations and shades to find the perfect color palette that aligns with your brand’s personality and objectives.
Final Touches
As a web blogger, putting the final touches on an HTML blog post is essential to create a visually pleasing and engaging reading experience. By using HTML tags, such as <strong> and </strong>, we can emphasize key phrases and make them stand out.
Additionally, using <h3> tags can help structure the content by creating subheadings. This allows the reader to easily navigate through the blog post and find relevant information.
Incorporating lists in HTML (<ul> and <li>) is another effective way to present information in a clear and organized manner. Whether it’s a bulleted list or a numbered list, using these tags can help break down complex ideas or provide a concise summary of key points.
Finally, adding emphasis by using the <b> tag is also an option. However, it’s worth noting that the <b> tag is considered outdated in HTML5, and it’s recommended to use the <strong> tag instead, as it carries more meaning and semantic value.
In conclusion, by utilizing HTML tags such as <strong> and <h3>, incorporating lists, and properly emphasizing important phrases using <strong> tags, we can enhance the readability and overall impact of our blog posts.